Installation
QRadar 7.3.1, should you upgrade?
The IBM QRadar 7.3.1 was released in the beginning of 2018. However, several companies still using past versions of the tool. One of the most asked question every time a new release is out is “Why should I upgrade?”. To answer this question, I compiled a list of interesting improvements in the past four major releases. This list was based on the official IBM release notes and several QRadar open mics.
- Indexing offence by any field, including custom fields
- Customize columns on log activity tab, create custom layouts
- See average EPS for each log source, on admin tab and reports
- Support of if/then/else and case statements on AQL queries
- Release of a software version of QRadar
- All logs and flows are compressed when stored
- Paging on searches (improving search performance)
- Change network interface configuration through the web console (IP address, interfaces, bonding, etc)
- Change firewall rules through the web console
- New APIs for QVM and incident retrieval
- Resource restrictions for specific users (searches)
- X-Force is already included in the QRadar subscription
- Reference sets are now domain specific, each client has their own domain set
- Data retention buckets now can be per tenant
- Offence assignment is improved and offence screen support tenants
- Web interface for DSM editor
- AQL support nested queries
- IBM Security Master Console now included with qradar. Provides a holistic view of the environment
- EPS/FPM is now a shared pool that can be distributed across devices
- QRadar now runs on RedHat 7.3, which allows LVM for partition management. It also uses the SystemD for service management, meaning that you have to use “systemclt” to manage things in the system, like service start/stop
- Activation keys are not necessary anymore. You select the type on a list
- No more limit on log source numbers. The limit is by EPS
- Tenant management is improved, the tenants can create their own reference sets and custom properties.
- AQL now supports advanced statements, such as session queries, bitwise operators and functions.
- Apps now can be outsourced to an external AppNode
- New interfaces for remote networks and remote services
- Java deployment editor doesn’t exist anymore, all device management happens through the admin interface
- New login screen, new logos and design.
- New app called Pulse, very interesting dashboards, provide “SOC Views” and fancy graphs
- Custom properties can now be based in AQL queries
- Now it is possible to identify if QRadar inverted the flow in the network activity tab
- Minor patch updates does not cause downtime anymore
- Event collection now runs as a separated service, meaning you can restart just the event collection in a device
- New left side menu, allows creating shortcuts and favourites
- Browser-based notifications
- New “QRadar Deployment Intelligence App” provides a lot of system health information
- Possibility to enforce password policy
- New “QRadar Assistant App” comes already with QRadar. It gives tips on how to use the tool, suggest apps, and provide a live feed of the IBM Security Support twitter.
- Log source auto-detection can now be controlled, allowing only certain types of log sources to be auto-detected
- Auto-discovery of event properties.
- New offering of a Data Storage solution for QRadar, this allows to some of the logs to be collected only and not parsed by the pipeline (saving EPS). This can be interesting if one of the devices is on debug mode.
- Support to JSON formats in log source extension parsing
- AQL can now be targeted by event processor, improving search time
- Geolocation is improved. Now you can manually enter the geolocation of IPs on the network hierarchy, so maps are correct.
- New App Developer Center, so people can develop their own apps with the IBM SDK
- Rules can now be triggered by distance on geolocation. “If a traffic comes from more than 100km from here”..
- The vulnerability manager and risk manager are completely redesigned.
- The incident forensics module supports packet capture and more advanced features
Monitoring Cloud Servers with QRadar
Cloud computing is an inevitable upward trend. Companies are looking for all the benefits cloud computing, such as cost effectiveness and scalability, but they may be neglecting the need of event monitoring in a cloud environment.
Configuring a SIEM solution to collect events from servers in a cloud environment may be simpler than you think. Cloud servers are still servers, meaning that they produce logs and events as any in-house server. In this post we will be discussing few strategies and architectures to consider when planning a QRadar implementation with servers in the cloud.
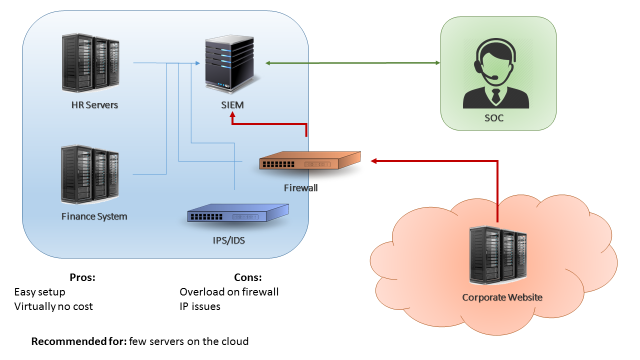
The first scenario is when you have just few servers in the cloud (less than 15% of your environment, or less than 500EPS coming from the cloud). A easy approach for this scenario can be simply configuring your cloud servers to send logs to your existing in-house QRadar collector (Figure 1). This can be accomplished by using a VPN between your cloud environment and your datacentre, or by configuring your firewalls to allow your cloud servers to send logs directly to your in-house collector. The benefits in this case are the fact that is a very easy setup and there’s virtually no costs. The downside on this design is that if your server generate a high number of events, your firewall/VPN could be overloaded.
The second scenario is when you have a substantial amount of servers in the cloud (between 30%-40% of your environment, or less than 5000 EPS). In this case, if you try to send all your events directly through a firewall or VPN you may overload the border network devices of your environment. The recommended approach in this case would be implementing a virtual collector/processor in your cloud environment (Figure 2). The cloud servers would send logs to your virtual collector/processor, which will parse the data locally and compress it before sending to the in-house SIEM collector. This architecture benefits from the fact that you will have an increased EPS capacity. Also, if your VPN dies or if the network is unstable you don’t lose events due to the fact the collector buffers the logs locally. In other hand, this architecture will have an extra cost (the additional collector) and, even with the traffic being compressed, it still may affect your firewall/VPN performance in case you’re monitoring a large quantity of servers.

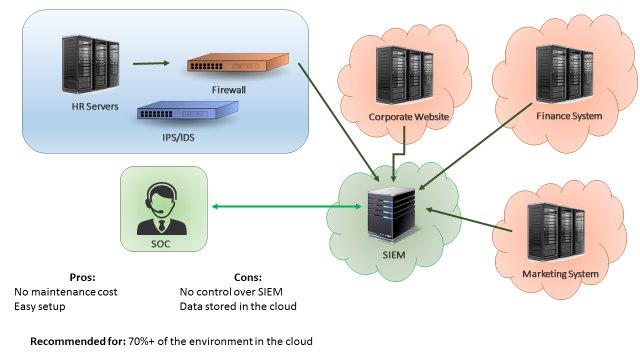
The third scenario is when most of your servers are in the cloud. In this case, a good approach would be having QRadar collectors (or even your whole QRadar infrastructure) deployed on the cloud, as seen on Figure 3. In this way, your border network devices will not be overloaded by logs sent from cloud servers to your internal SIEM. A similar approach would be having “QRadar as service”, which is a service from IBM where all the SIEM infrastructure is taken care by the IBM team. The advantages of having SIEM as a service is that you don’t need to worry about the SIEM maintenance and there’s little to none setup effort. The disadvantages is that your data will be stored in the IBM cloud environment, which for some companies may not be adequate.
Those are the three most common approaches when monitoring cloud servers with a SIEM solution. It is important to remember that each case is a case, meaning that each company should analyse their current and future environment before designing a SIEM implementation. You may find that a combination of the presented approaches may suit best your needs. The most important thing is remembering that monitoring servers in the cloud is as important as monitoring in-house servers.
Installing a Device Adapter on the QRadar Risk Manager
Today I was trying to install device adapters into the new QRadar Risk Manager 7.2. After sometime struggling (due the “incomplete” IBM documentation) I decided to create this post to help you guys to configure a new adapter in the Risk Manager. First things first, for those who don’t know, the QRadar Risk Manager need an adapter for each kind of device that you want to monitor the configuration. It means for example, if you have few Checkpoint Firewalls and few Cisco routers that you want to monitor the configuration, you will need to install the Checkpoint adapter and the Cisco adapter.
So, here’s the step by step to configure the adapters:
[All the files mentioned in this post can be found in this link, or at www.ibm.com/support/fixcentral ]
– Install the dependencies: (Only necessary in the first time configuration)
- Download the rpm files: “ziptie-server” and “adapters-common” in your machine;
- Connect to the Risk Manager server using SSH.
- Create a new folder: /tmp/adapters
- Copy the downloaded files from your computer into the new folder
- Execute: rpm -Uvh ziptie_filename.rpm (use the ziptie file that you just transferred)
- Execute: rpm -Uvh adapterscommon_filename.rpm (use the adapterscommon file that you just transferred)
- Execute: service ziptie-server restart
– Install the adapter: (Repeat it for all the necessary adapters)
- Download the rpm files for your adapter, example: cisco_adapter.rpm into your machine;
- Connect to the Risk Manager server using SSH;
- Copy the downloaded files from your machine to the folder /tmp/adapters ;
- Execute: rpm -Uvh cisco_adapter.rpm (Change the filename for the adapter downloaded)
- Execute: service ziptie-server restart
After those steps your adapter will be ready for use.
If you want, you can check the official IBM documentation in this link, but I found some missing steps on it.
Changing firewall rules
By the original QRadar configuration, all the appliances comes with a pre-configured firewall rules in the OS. For testing purposes we can simple deactivate the firewall using the command “service iptables stop” (to stop the firewall) and “service iptables start” (to turn it back). But sometimes we need to update the firewall configuration aiming permanent changes.
In order to change firewall rules on your appliance you need to follow the below steps:
- Connect through SSH to the appliance that you want to make modifications;
- Login using ‘root’ account;
- Edit one of the following files:
- /opt/qradar/conf/iptables.pre
- /opt/qradar/conf/iptables.post
- /opt/qradar/conf/iptables-nat.post
- Add your firewall rules in the file, for example:
- -A INPUT -i eth0 -s x.x.x.x -j ACCEPT
- Save the file with the ‘ :wq ‘;
- Run /opt/qradar/bin/iptables_update.pl so your changes take effect;
With those steps your firewall configuration is now changed and will persist even in rebooting cases.
Changing the SSL Certificate
In this post we are going to explain in a simply way how to change the SSL certificate of QRadar. For the folks that already worked with IBM products know how tricky it were, but with QRadar it is way easier. In less than 10 steps you can import your self-signed or trusted certificated into QRadar.
- Get your self-signed or trusted certificate (remember: you need the public and private key);
- Log into your QRadar console using SSH;
- Transfer the certificate to some folder inside the QRadar, example:
/certificates/qradar_priv_certificate.pfx and /certificates/qradar_public_certificate.cer - Execute the following command: /opt/qradar/bin/install_ssl_cert.sh -i
- The script will ask you the path to the private certificate file. Just type the path you used on step 3.
- The script can ask you the public certificate, just type the path you used on step 3;
- To confirm the change, type ‘y’ and press enter;
- After the completion, restart the hostcontext service using the command:
service hostcontext restart - After the restarting the service, open the QRadar using HTTPs using your browser and verify the certificate;
Basically, the QRadar will make all the tricky part and will update the SSL certificate for you.
You can find the official documentation about the SSL certificate change in this link (that basically explain this 10 steps in 10 pages).
